Down4Sound
D4S JP40 Voltage, Temperature Monitoring & Notification System
- SKU:
- JP40-MonitorNotification
Description
*ONLY COMPATIBLE WITH JP40 LITHIUM BATTERY*
THE IMPORTANCE OF THE REMOTE DISPLAY:
In demanding conditions of high amperage discharge, fast charging, and extended high
amperage discharge, it is important to monitor the battery to keep the battery from being
damaged. If the battery is discharged below the minimum voltage the battery will be damaged,
and such damage will cause the battery to lose performance and/or cause a dangerous
operating condition which could result in personal injury, equipment damage, or death. The
same is true if the battery is allowed to over heat, or be over charged. This remote tool is a way
to monitor the battery’s operation within the specified parameters without a putting restrictive
Battery Management System (BMS) that reduces the amount of control the user has over the
battery’s operation. As with all tools, it is only as effective as the user. If the warnings are not
heeded, or ignored the battery may become damaged, and this will void the warranty.
CONNECTION METHOD
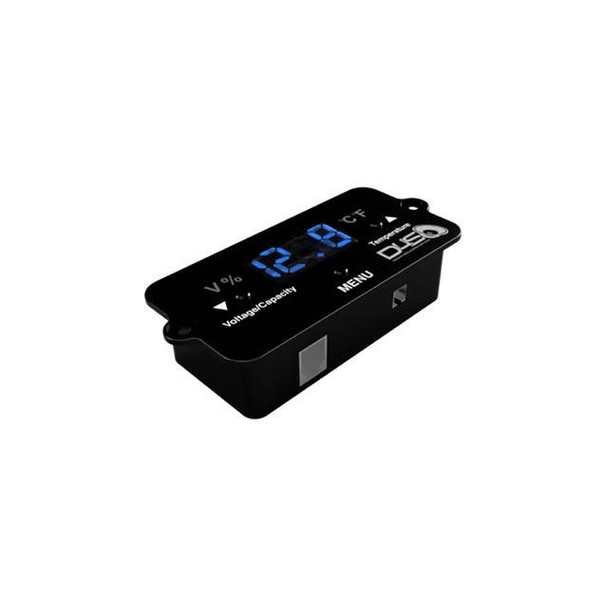
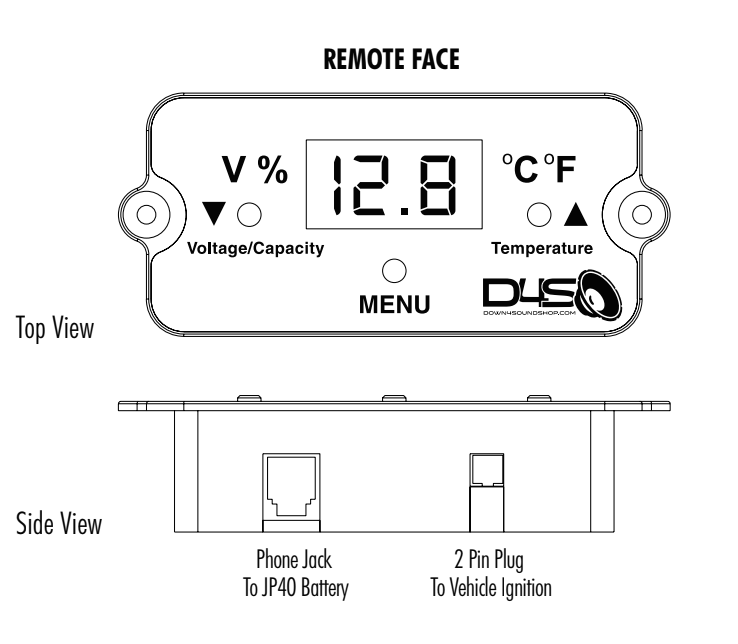
The remote monitor has 2 plugs, a Phone jack, and an 2 pin port. The phone jack is connected
from the remote monitor and the plug labeled “remote” on the face of the battery.
The 2 pin plug on the remote monitor can be used to connect the monitor to a 12V power
supply, (Example: the cars ignition system.) as a alternate power supply to keep the remote
monitor from using the battery’s power.
INSTRUCTION FOR USE:
Connect the battery with the remote monitor using the supplied cable.
To Change Voltage/Capacity Display
The default mode of the voltage/capacity display is the battery’s voltage. If the button
marked “Voltage/Capacity” is pressed, the display will change to the show the battery’s
capacity in percentage of remaining charge. If the button is pressed again, it will return to
the default display.
To Change The Temperature Display:
The default mode of the temperature display is in Fahrenheit (Fo). If the button marked
“Temperature” is pressed, the display will change to the unit of Celsius (Co). If the button is
pressed again, it will return to the default display.
REMOTE
The JP40 Remote Display ships in the default setting that allows for plug and play use with the
JP40 battery. Initial programming is not required when you purchase this remote for use with
JP40. However, this remote is also designed to be used universally with AGM, Li-Po, LTO and
other LFP type batteries in many configurations. Although the programming details shown
below are accessible, they are only applicable to the universal remote model, which includes
the voltage and temperature sending unit that can be used external to any battery. This will
not allow for the accurate internal temperature readings you get from your JP40 Battery since
the sending unit is already inside the battery. The programming instructions are provided
below for knowledge about these functions in case the menu is accessed accidentally, and the
settings need to be corrected for accurate functionality of the remote display.
Press and hold the “Menu” button for six (6) seconds to access the program mode. The display
will flash indicating it is in program mode. If no buttons are pressed within six (6) seconds the
unit will automatically exit program mode.
To set battery type, enter program mode. Use the Buttons marked with the up and down arrows
to select the correct battery type. The battery types available to select are as follows:
L - Lithium Ion Batteries (Li-ion, Li-po) [ Cell Voltage is 3.6V-3.8V ]
F - Lithium Iron Phosphate Batteries (LFP) [ Cell Voltage is 3.2V ]
P - Lead Acid Batteries (AGM) [ Battery Voltage is 12V ]
t - Lithium Titanate Oxide Batteries (LTO) [ Cell Voltage 2.4V ]
Once the battery type is selected, press the “Menu” button again to set the number of cells in
series. The display will once again flash,
Set the number of cells in series using the up and down arrows as before.
EXAMPLE: 3S - is set to 03
4S - is set to 04
5S - is set to 05.... Etc.
After six (6) seconds with no buttons pushed, the unit will exit program mode automatically. If
the setting are not correct, re-enter program mode and select the correct settings. If the remote
setting are incorrect, the information displayed by the remote will also be incorrect.
Warranty Information
Warranty Information
Your new Down4Sound product is covered by 1 limited warranty if purchased from Down4Sound or an authorized Down4Sound dealer. This warranty does not cover improper installation, accidental damage, misuse, abuse, improper wiring, operation of unit outside of listed specifications, or any product that has been modified or repaired by anyone other than Down4Sound. Your warranty covers defects in materials and/or workmanship ONLY and is not an insurance policy. The warranty only covers the original owner of the amplifier.
All warranty returns must be accompanied by the original sales invoice or receipt. You must contact us to request an RMA number prior to sending any returns via the RMA request form on our website. You are responsible for the cost of shipping your product back to us for warranty examination. If your product is covered under warranty, shipping back to you will be at no charge to you – if your product is replaced/repaired outside of warranty you must pay for return shipping and repair bill prior returning of the product or if no defect is found you are required to pay for return shipping only.
At the sole discretion of Down4Sound your product will be either repaired or replaced when it is being covered under warranty. In the event of shipping damage due to improper packaging on products being returned to Down4Sound the customer is liable for the cost of all damages, necessary repairs, or replacement. Be sure to properly pack your return!
* Extended additional warranty purchased on amplifiers take in affect from the date of purchase and must also be stated on orginal sales invoice or receipt.
Refund/Return Policy: https://www.down4soundshop.com/shipping-returns/

